TPM hardware attacks

Trusted Computing has been a controversial addition to PCs since it was first announced as Palladium in 2002. Recently, a group at Dartmouth implemented an attack first described by Bernhard Kauer earlier this year. The attack is very simple, using only a 3-inch piece of wire. As with the Sharpie DRM hack, people are wondering how a system designed by a major industry group over such a long period could be so easily bypassed.

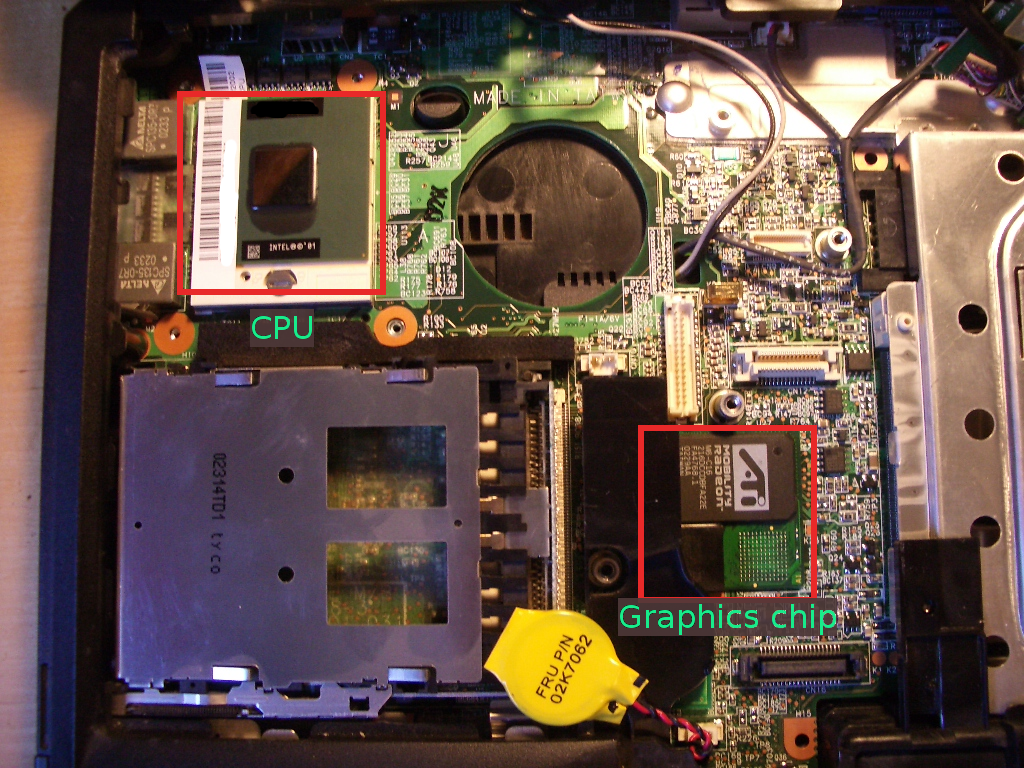
The PC implementation of version 1.1 of the Trusted Computing architecture works as follows. The boot ROM and then BIOS are the first software to run on the CPU. The BIOS stores a hash of the boot loader in the TPM’s PCR before executing it. A TPM-aware boot loader hashes the kernel, appends that value to the PCR, and executes the kernel. This continues on down the chain until the kernel is hashing individual applications.

How does software know it can trust this data? In addition to reading the SHA-1 hash from the PCR, it can ask the TPM to sign the response plus a challenge value using an RSA private key. This allows the software to be certain it’s talking to the actual TPM and no man-in-the-middle is lying about the PCR values. If it doesn’t verify this signature, it’s vulnerable to this MITM attack.

As an aside, the boot loader attack announced by Kumar et al isn’t really an attack on the TPM. They apparently patched the boot loader (a la eEye’s BootRoot) and then leveraged that vantage point to patch the Vista kernel. They got around Vista’s signature check routines by patching them to lie and always say “everything’s ok.” This is the realm of standard software protection and is not relevant to discussion about the TPM.

How does the software know that another component didn’t just overwrite the PCRs with spoofed but valid hashes? PCRs are “extend-only,” meaning they only add new values to the hash chain, they don’t allow overwriting old values. So why couldn’t an attacker just reset the TPM and start over? It’s possible a software attack could cause such a reset if a particular TPM was buggy, but it’s easier to attack the hardware.

The TPM is attached to a very simple bus known as LPC (Low Pin Count). This is the same bus used for Xbox1 modchips. This bus has a 4-bit address/data bus, 33 MHz clock, frame, and reset lines. It’s designed to host low-speed peripherals like serial/parallel ports and keyboard/mouse.

The Dartmouth researchers simply grounded the LPC reset line with a short wire while the system was running. From the video, you can see that the fan control and other components on the bus were also reset along with the TPM but the system keeps running. At this point, the PCRs are clear, just like at boot.  Now any software component could store known-good hashes in the TPM, subverting any auditing.

This particular attack was known before the 1.1 spec was released and was addressed in version 1.2 of the specifications. Why did it go unpatched for so long? Because it required non-trivial changes in the chipset and CPU that still aren’t fully deployed.

Next time, we’ll discuss a simple hardware attack that works against version 1.2 TPMs.

Hypervisor rootkit detection strategies

Keith Adams of VMware has a blog where he writes about his experiences virtualizing x86. In a well-written post, he discusses resource utilization techniques for detecting a hypervisor rootkit, including the TLB method described in his recent HotOS paper (alternate link).

We better find a way to derail Keith before he brainstorms any more of our techniques, although we have a reasonable claim that a co-author has published on TLB usage first. :-) Good thing side channels in an environment as complex as the x86 hardware interface are limitless!

Undetectable hypervisor rootkit challenge

I’m starting to get some queries about the challenge Tom, Peter, and I issued to Joanna. In summary, we’ll be giving a talk at Blackhat showing how hypervisor-based rootkits are not invisible and the detector always has the fundamental advantage. Joanna’s work is very nice, but her claim that hypervisor rootkits are “100% undetectable” is simply not true. We want to prove that with code, not just words.

Joanna recently responded. In summary, she agrees to the challenge with the following caveats:

  • We can’t intentionally crash or halt the machine while scanning
  • We can’t consume more than 90% of the CPU for more than a second
  • We need to supply five new laptops, not two
  • We both provide source code to escrow before the challenge and it is released afterwards
  • We pay her $416,000

The first two requirements are easy to agree to. Of course, the rootkit also shouldn’t do either of those or it is trivially detectable by the user.

Five laptops? Sure, ok. The concern is that even a random guess could be right with 50% probability. She is right that we can make guessing a bad strategy by adding more laptops. But we can also do the same by just repeating the test several times. Each time we repeat the challenge, the probability that we’re just getting lucky goes down significantly. After five runs, the chance that we guessed correctly via random guesses is only 3%, the baseline she established for acceptability. But if she wants five laptops instead, that’s fine too.

I don’t have a problem open-sourcing the code afterwards. However, I don’t see why it’s necessary either. We can detect her software without knowing exactly how it’s implemented. That’s the point.

The final requirement is not surprising. She claims she has put four person-months work into the current Blue Pill and it would require twelve more person-months for her to be confident she could win the challenge. Additionally, she has all the experience of developing Blue Pill for the entire previous year.

We’ve put about one person-month into our detector software and have not been paid a cent to work on it. However, we’re confident even this minimal detector can succeed, hence the challenge. Our Blackhat talk will describe the fundamental principles that give the detector the advantage.

If Joanna’s time estimate is correct, it’s about 16 times harder to build a hypervisor rootkit than to detect it. I’d say that supports our findings.

[Edit: corrected the cost calculation from $384,000]

IBM Thinkpad overheating chipset fix

I’ve used Thinkpads for a long time for the relative build and BIOS quality, although recently I switched to the Panasonic Y series. I still have an IBM R32 for guests to use but recently it began blue screening randomly.

The symptoms were that it would run ok for a while, a couple hours to a few days, and then would get a STOP error in ati2advg.dll. Often, it would do this when beginning to play a video. I had tried various combinations of video drivers with little change. RAM tests showed no problems.

I found on various forums that the T42 and possibly other systems had a build problem where picking up the laptop by one corner would cause a heatsink to momentarily detach from the chipset, resulting in a similar blue screen. This sounded familiar, so I disassembled the laptop. (Disclaimer: doing so voids your warranty, I take no responsibility for your actions.)

Getting a copy of the hardware maintenance manual helps find all the screws and tabs. On most laptops, the first step is to get the keyboard removed and then other screws become accessible.

As you can see, the heatsink for the graphics chip is merely a piece of aluminum tied to the drive bay. It had a bit of sticky tape between it and the chip, but it didn’t make full contact with the chip below.

r32-4.png

After removing the CPU and graphics chip heat sinks, you can see the CPU on the upper left and the graphics chip in the multi-chip module near the center. Since the chips on this small module are in an L-shape and the heatsink was centered, it only contacted the very edges of each of the chips.

r32-1.png

I decided this was likely the problem, so made a new heat spreader for the graphics chip while avoiding adding much weight. I took an old punch-out panel and cut a rectangle using my Dremel tool.

r32-2.png

After cutting, it looked like this:

r32-3.png

I put some heatsink compound on it and attached it to the graphics chips. To keep the corner from shorting out against the solder pads, I put a small square of double-stick tape in the empty space of the “L”. This helped secure the heat spreader, although I’m mostly depending on pressure from the heat sink to keep it in place. I then reattached the heat sink over it and reassembled the laptop.

When reassembling everything, be careful!  The screws that hold the CPU heatsink snap extremely easily.  Once they stop moving under even gentle force,  don’t push them any farther.  I ended up fabricating some out of some old parts.  Don’t make the same mistake.

I’ve run various stress tests, including accidentally leaving it in the sun for a few hours and it hasn’t crashed since. The keyboard above the chip also feels noticeably cooler.

Fault-tolerant system design

When designing a system, I have a hierarchy of properties. It is somewhat fluid depending on the application but roughly breaks down as follows.

  1. Correct: must perform the basic required function
  2. Robust: … under less-than-perfect operating conditions
  3. Reliable: … handling and recovering from internal errors
  4. Secure: … in the face of a malicious adversary
  5. Performance: … as fast as possible

I’d like to talk about how to achieve reliability. Reliability is the property where the system recovers from out-of-spec conditions and implementation errors with minimal impact on the other properties (i.e., correctness, security). While most system designers have an idea of the desired outcome, surprisingly few have a strategy for getting there. Designing for reliability also produces a system that is easier to secure (ask Dan Bernstein.)

Break down your design into logical components

This should go without saying, but if you have a monolithic design, fault recovery becomes very difficult. If there is an implicit linkage between components, over time it will grow explicit. Corollary: const usage only decreases over time in a fielded system, never increases.

Each component of the system should be able to reset independently or in groups

As you break down the system into components, consider what dependencies a reset of each component triggers. A simple module with less dependencies is best. I use the metric of “cross-section” to describe the complexity of inter-module dependencies.

Implement reset in terms of destructors/constructors

Right from the beginning, implement reset. Since you’re already coding the constructors and should have been coding destructors (right?), reset should be easy. If possible, use reset as part of the normal initialization process to be sure it doesn’t become dead code.

Increase the speed of each component’s recovery and make them
restart independently if possible

If components take a long time to recover, it may result in pressure from customers or management to ditch this feature. A component should never take longer to recover than a full system reset, otherwise rethink its design. Independence means that reset can proceed in parallel, which also increases performance.

Add a rollback feature to components

In cases where a full reset results in loss of data or takes too long, rollback may be another option. Are there intermediate states that can be safely reverted while keeping the component running?

Add error-injection features to test fault recovery

Every component should have a maintenance interface to inject faults. Or, design a standard test framework that does this. At the very least, it should be possible to externally trigger a reset of every component. It’s even better to allow the tester to inject errors in components to see if they detect and recover properly.

Instrument components to get a good report of where fault appeared

A system is only as debuggable as its visibility allows. A lightweight trace generation feature (e.g., FreeBSD KTR) can give engineers the information needed to diagnose faults. It should be fast enough to always be available, not just in debug builds.